Blackboard 9 How to Show Column Again
Video: Gradebook Overview
Watch a video most the gradebook
The following narrated video provides a visual and auditory representation of some of the information included on this folio. For a detailed clarification of what is portrayed in the video, open the video on YouTube, navigate to More actions, and select Open transcript.
Video: Gradebook overview shows the grading interface.
Admission the gradebook
Run across what you need to grade in all your courses. Or, drill correct into a course and become started.
Global Grades page
Do you want to meet everything that needs grading in all your courses?
This information also applies to organizations.
In the list where your proper noun appears, you accept access to all your grading tasks on the global Grades page. Select an item'southward title to open it in a layer. Choose a submission and start grading!
All your grading tasks are organized by class. No need to navigate to each course to see what'southward prepare to grade. Want more details? Select a title, and view all the work and management functions.
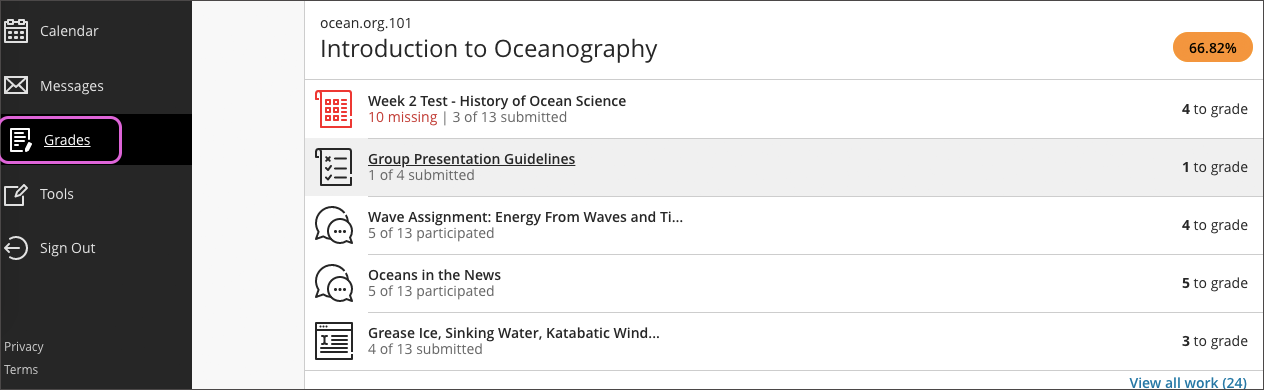
You meet items that are ready to class or which assignments, tests, and graded discussions are overdue for how many students.
If y'all participate in courses equally an teacher and a student, the page shows information for both roles.
Courses announced together in alphabetical order.
In the Original Course View, y'all complete your grading tasks in the original Class Center interface.
Form gradebook
Ready to beginning grading?
Inside your course, y'all can open up the course gradebook from the navigation bar. Select the Gradebook tab to access all the coursework that'south specific to the grade you're in.

The gradebook is populated with students when they're enrolled in your form. You lot tin grade coursework, manage items, and post grades from two views:
- Gradable items listing
- Pupil grid
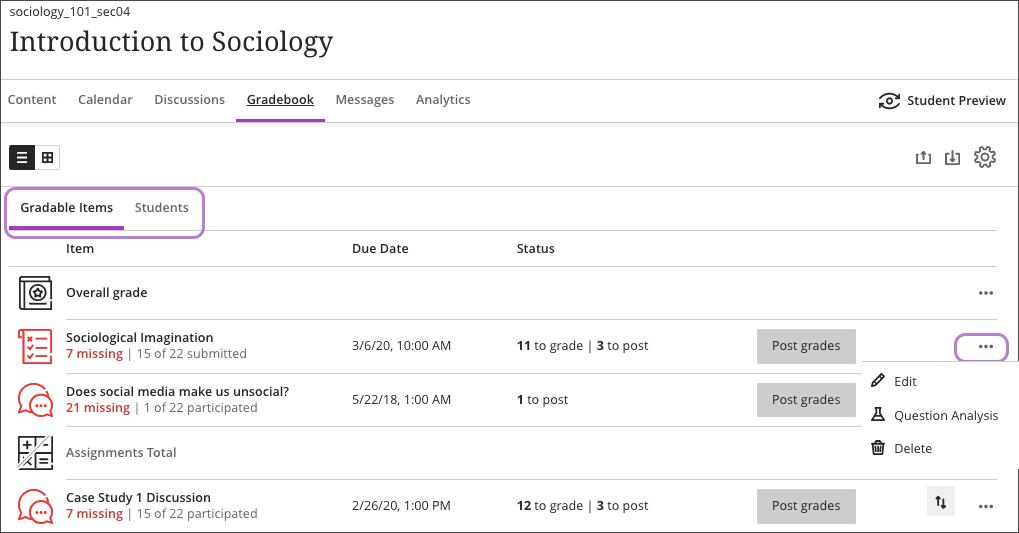
Gradable Items list
The Gradable Items list is your default view of the course gradebook. You can view all the coursework you've assigned and your grading progress. You can besides access the management functions.
You can switch to the Students tab to view an overall picture of each educatee'due south engagement.
Make up one's mind your view. Change from list view to the student grid view.

Open up items. Select an item's title to open a new layer. Come across whose submissions demand grading and who hasn't received their grades however. Use the Filter menu to display simply those submissions that need grading. At this fourth dimension, you lot tin can filter past All statuses and Needs grading. The Filter carte doesn't appear for group and discussion items. At this fourth dimension, y'all can but form journal submissions from the student filigree view. Enhancements to the journal grading workflow are in progress at this fourth dimension.
More near the submissions list
Bank check your progress. Run into how many submissions you lot demand to grade and grades you have to post. Complete indicates you lot have no outstanding grading tasks for that particular. All graded appears when all submitted attempts are graded and posted, just some students oasis't submitted work still and don't have grades.
Manage grades. Open an item's menu to access the management functions, such as Edit and Delete.
Add a row. Select the plus sign wherever you want to add together a row:
- Add Item: Add a row for coursework, such every bit a participation grade. Your title is limited to 255 characters. Cull the grade unit of measurement, such as points or letter.
- Add Calculation: Add a row for a calculation, such every bit an boilerplate assignments class.
- Add Omnipresence: Add a row for attendance. After y'all add attendance, the add option won't appear in the card again.
If you desire to remove attendance from the gradable items, you can practise so from the attendance settings or the gradebook grid.
More than on the attendance feature
Rearrange items. Press the Move icon in the row of the item you want to motility. The Motility icon is the 1 with the two paired arrows. It won't be visible unless you mouse over the desired item row at the far correct terminate of it. The item row won't motion unless you lot select it by pressing on the respective pointer icon. Only so, yous can drag and driblet it to the new location.
Drag the particular to the new location and release. The gild you choose also appears in the grid view and on students' Grades pages. You tin't move items in the grid view at this time.
More on rearranging the gradebook list view
Students tab
View data well-nigh your students and their engagement in your class from the Students tab.
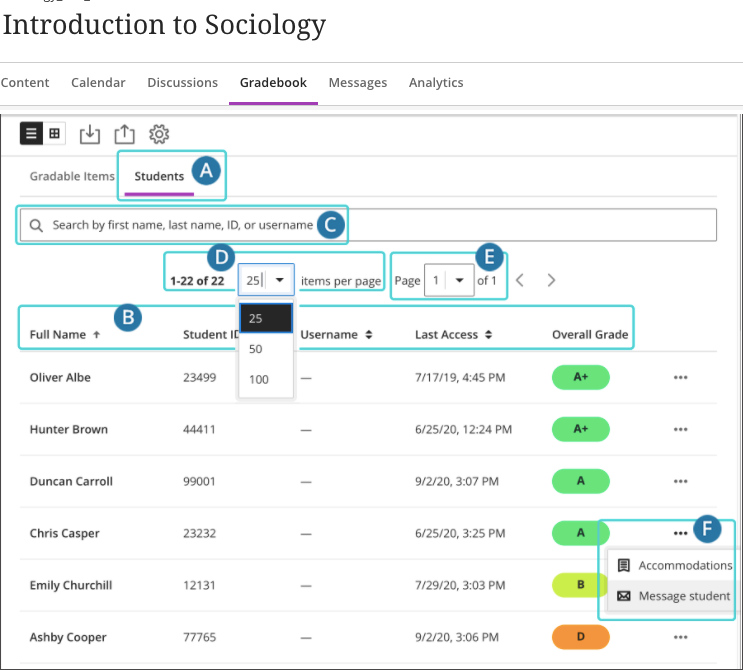
- Change your view. Hands navigate betwixt the Gradable Items and the Students tab to see your grading tasks and up-to-the-infinitesimal data about your students.
- View student information. View a listing of your students along with columns for Student ID, Username, Last Admission, and Overall Grade. For the Overall Form column, you need to set the overall grade for grades to appear in the grade pills. The overall grade displays as a form or a percentage; yous get to choose how information technology displays. You can sort the list in ascending, descending or default order by clicking the corresponding column header arrow icon.
- Search for a student. Limit your search to a few letters or the beginning or last proper name for the best results. You can also search by educatee ID and username, if the latter is made visible by your institution.
- Gear up your view. Apply the Items per page menu to select how many student rows to prove on a page.
- Navigate the list. Employ the menu at the peak or bottom of the page to move to the previous and next pages in the student listing.
- Accommodations and Messages: Select the iii dot menu at the end of each student row to view or create accommodations for a specific educatee, or to send direct messages.
You tin besides sort the list by cavalcade selecting the arrow icon side by side to a column'due south proper noun. Every fourth dimension yous select an pointer icon information technology volition change to bear witness the student listing in ascending, descending or default order.
If you don't see any information nether the Username cavalcade, yous can ask your Administrator for guidance. Your institution may accept privacy protection policies in place.
Select student names to view their submissions on their individual Pupil Grades page. In the Status column, you can see completed work, items that demand grading, and grades you need to post. Y'all can likewise view the grades and feedback you've provided, create accommodations and transport direct messages.
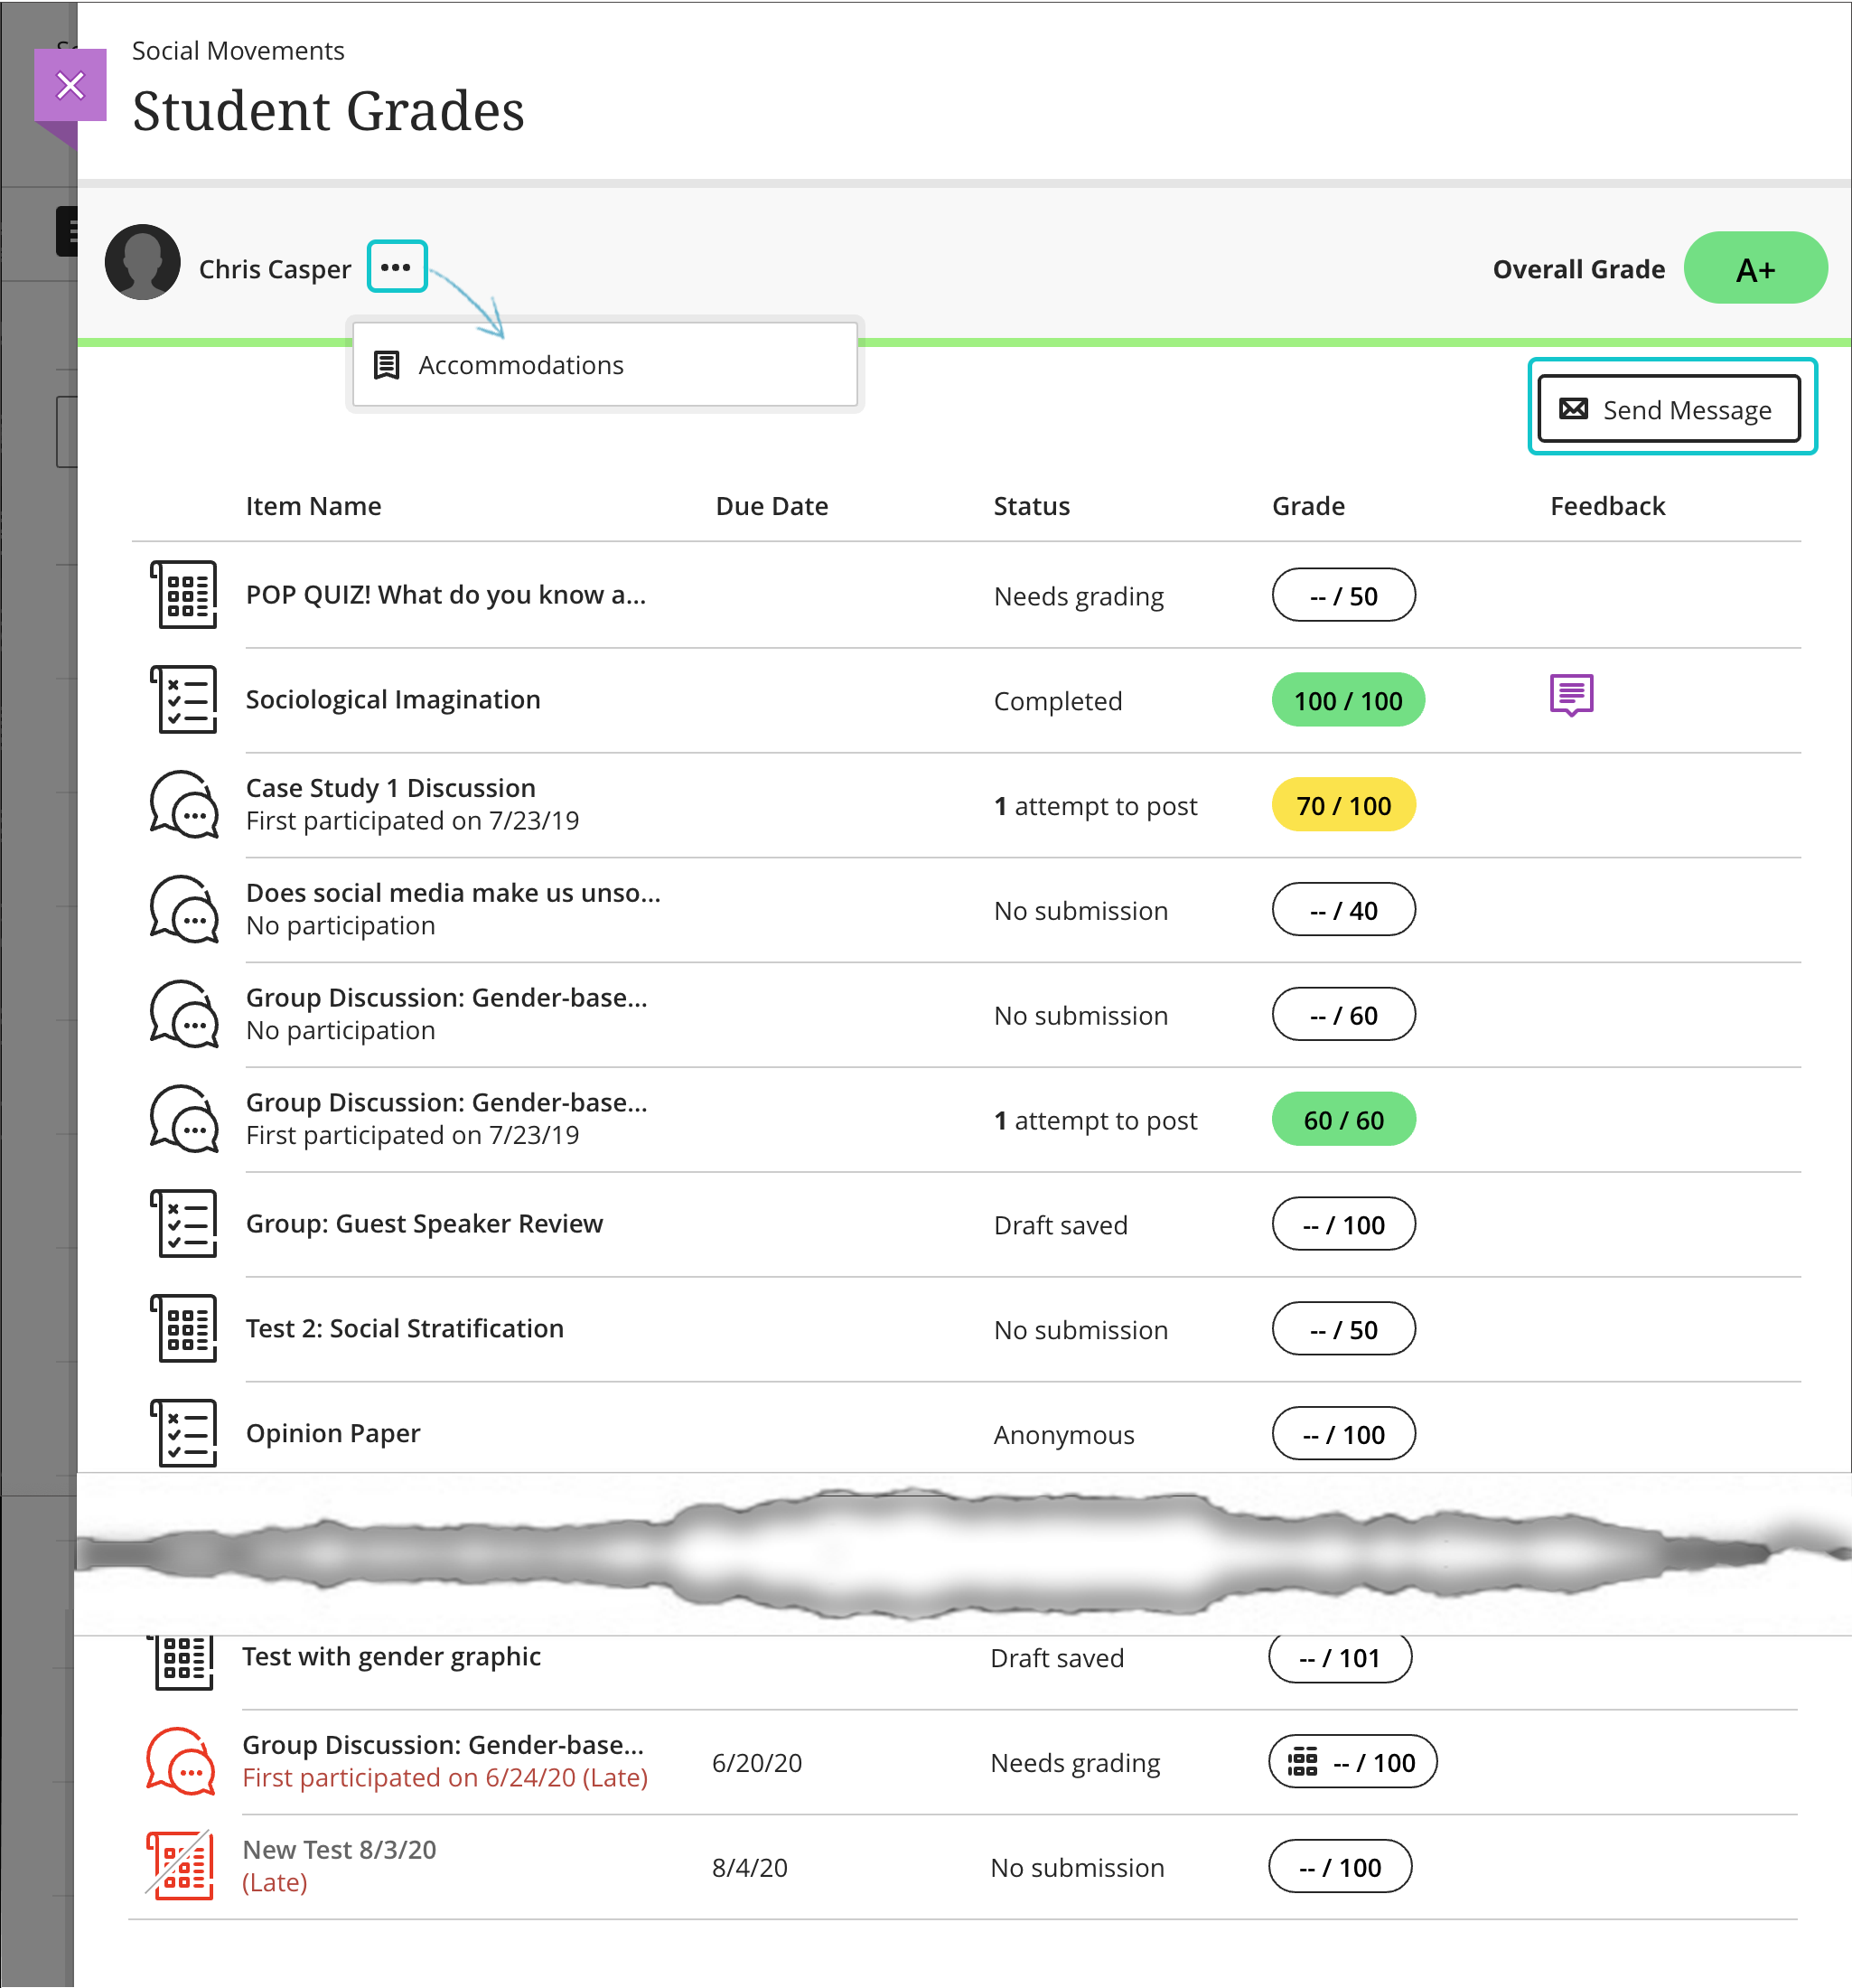
You tin select items that need grading and the submission opens.
If you provide a grade direct on the Pupil Grades page, the Override label doesn't announced in this view. The Override label does appear on the detail's Submission page.
Send messages from the student list view
From the student list, yous tin can send a message to anyone involved with your course.
Select the three dot menu at the right finish of a student row. Select theMessage Student selection. The Message console will open at the correct side of the screen.
Messages you lot send from the student list view also appear on the Letters page.
You can send an email re-create of a course message. Students might see, read, and act on important announcements and course letters when they receive a copy in their inboxes. Email copies are merely delivered if recipients have valid e-mail addresses in their Blackboard Learn profiles. When you select this option, all recipients of the message receive an electronic mail copy.
Recipients can view your message in their email inboxes, but won't be able to send an email to reply.
If you select the name of a student from the list, you volition arrive to the Student Grades page. At the upper correct corner y'all can select the Send message button from where you tin can besides send a message to that student.
More on sending messages
Add together accommodations from the Pupil list view
You lot tin set up accommodations for individual students. You tin exempt students from assessment due dates or time limits. Employ accommodations to help students progress in the course even though they may take difficulty with some requirements.
Select the three dot menu at the right end of a student row. Select theAccommodations option. The Accommodations console will open up at the right side of the screen.
If y'all select the proper name of a student from the list, yous will arrive to the Educatee Grades page. Side by side to the student's name y'all can select the three dot carte from where you tin can likewise open the Adaptation panel for that student.
Once you have created accommodations for a student, a purple marker volition appear in front of the student'south name to indicate the student has accommodations.
Yous tin can also give an individual student an exception on a specific test or assignment. An exception includes additional attempts or extended access, even if the cess is hidden from other students. An exception overrides the 2 settings applied to anybody else for only that specific assessment.
More on assessment exceptions
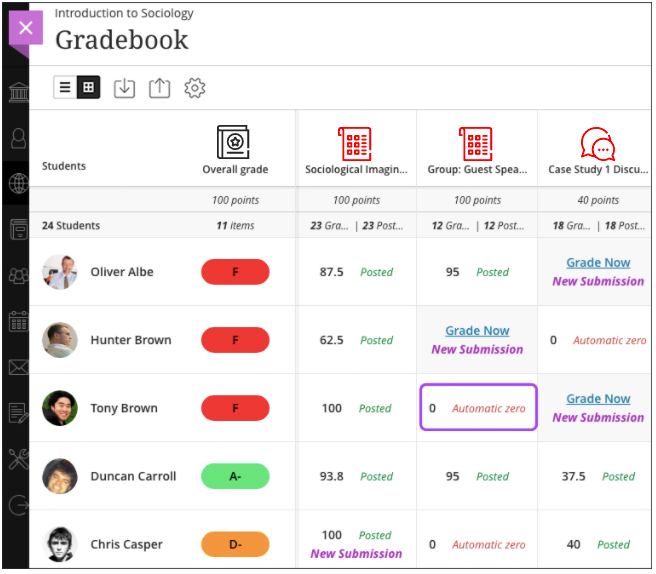
Student grid
The student grid displays the scores students accept earned. Select a cell to begin grading.
If more than one student has the aforementioned proper name, select a student's profile picture. A pop-upwards contour card displays the pupil's ID. Duplicate names are ordered past ID.
If you hid pupil names for assessments without questions, you'll see Anonymous in each student's prison cell. Y'all can't assign or edit grades.
More on anonymous grading
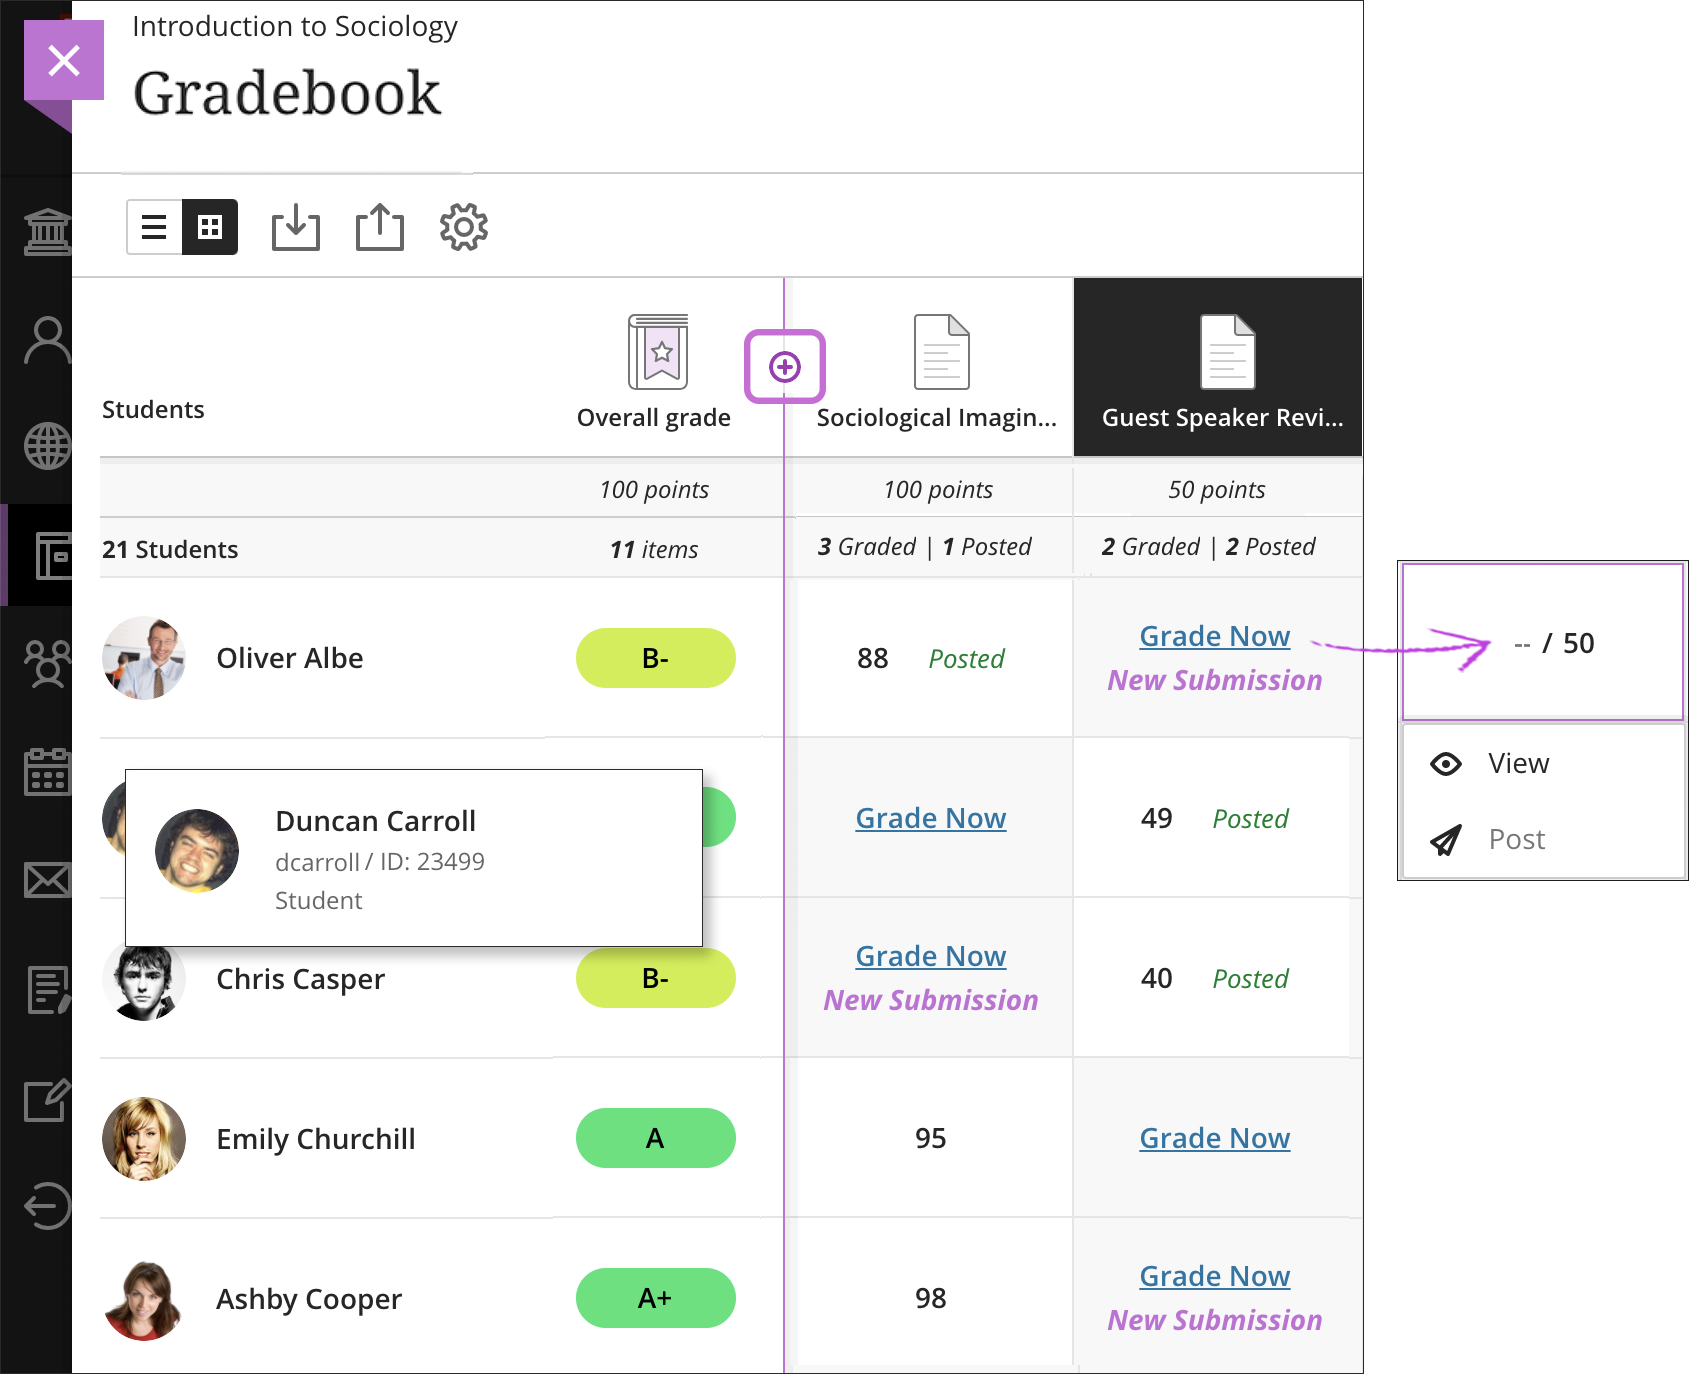
Manage columns. Select a column title to access the management functions, such as Edit and Delete.
Assign and manage grades. New Submission appears in cells when students accept submitted work. Click anywhere in a cell to access the management functions or assign a grade. Select the cell or course value to edit an existing grade or add a new entry. Afterwards you assign a value, click anywhere outside the class surface area to save.
View submissions. If a submission exists, select View in the menu to view the student's work. The View pick is disabled if no submission exists.
Postal service grades. When you're ready to release grades to students, select the Postal service option in the column header. All grades you've assigned for this column are posted for students to come across. If you want to mail one at a fourth dimension, click within that educatee's cell and select Postal service in the carte du jour. Posted grades appear with a Posted message in the column.
Add items or calculations. Select the plus sign wherever you want to add an item or calculation.
View total points. In each column header, you can view the total points for each item or calculation and easily run into the class each student earned.
View your grading progress. In each column header, the number of graded submissions appears, forth with the number of grades you've posted. When you lot've graded and posted all the submissions, Complete appears.
Search the gradebook
In filigree view, you can narrow your view to show but 1 student's row, one column, or an entire category, such as assignments.
For example, y'all can search for a specific student by name or ID and focus on that pupil's attempts and grades. You can too share grades with the student in a live office session. The grades for other students are protected and privacy is maintained.
In the search box, type 1 or more than characters. The search results include all students, columns, and categories that lucifer, in that lodge. Brand a selection from the listing or refine your search.
Later on you make a selection, the student's row, cavalcade, or category of columns appears. Select the X in the search box to render to the full gradebook filigree view.

You tin can also search an item'south submissions listing for a specific student or group.
Filter by merged courses
You can filter your gradebook view based on merged courses. In the student grid view, select Filter to open the Filter Criteria panel. Filter only appears if you accept merged courses. All the students from all your merged courses appear in the active filter area.
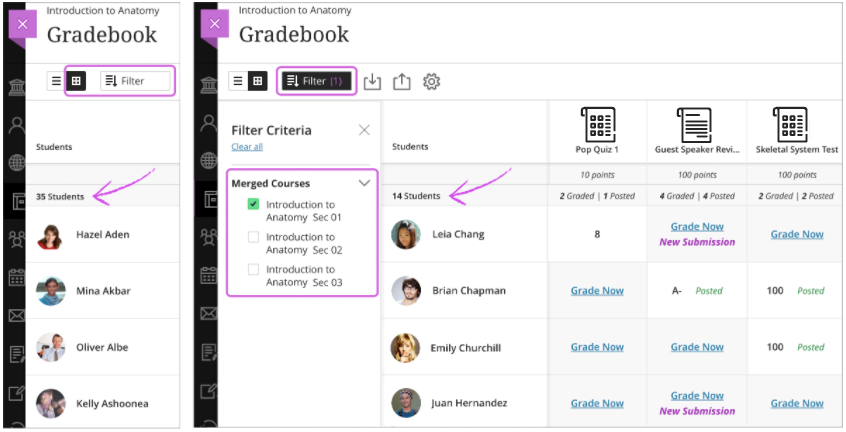
As you select child courses in the panel, the listing of students changes to lucifer enrollment in the child courses. You can select 1 or more kid courses.
The information at the height of the panel shows how many courses you chose. Select the X to collapse the panel and increase the area to view the student grid. Select Clear all to articulate the check boxes.
After you've filtered your view, you can use the search part to narrow the results.
Gradebook settings
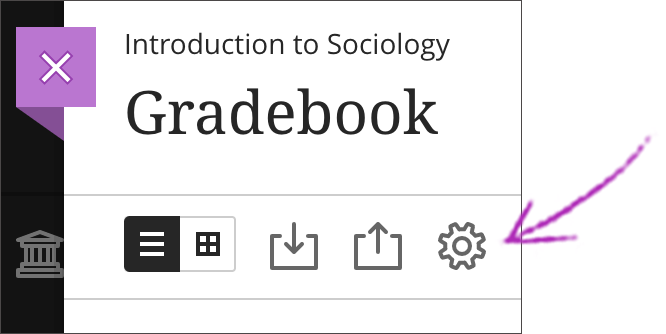
From your form gradebook, you tin add together or make changes to your existing settings to fit your grading methods. Select the Settings icon to access the Gradebook Settings panel.
Gradebook Settings panel
From the Gradebook Settings console, you can manage Grade Schemas and Grade Categories, add together Automatic Zeros and constitute Student Functioning settings.
Student Performance
From this department, you tin adjust the activity performance criteria required to receive alerts in your activity stream such as days of inactivity or limit per centum grades and, in turn, send those alerts to students. The link to View class performance behavioral graphic is visible only for those courses with plenty data to populate it.
Select View course performance to open up the respective graphic and the listing of students for the course. You can in turn select any student to check on an private functioning.
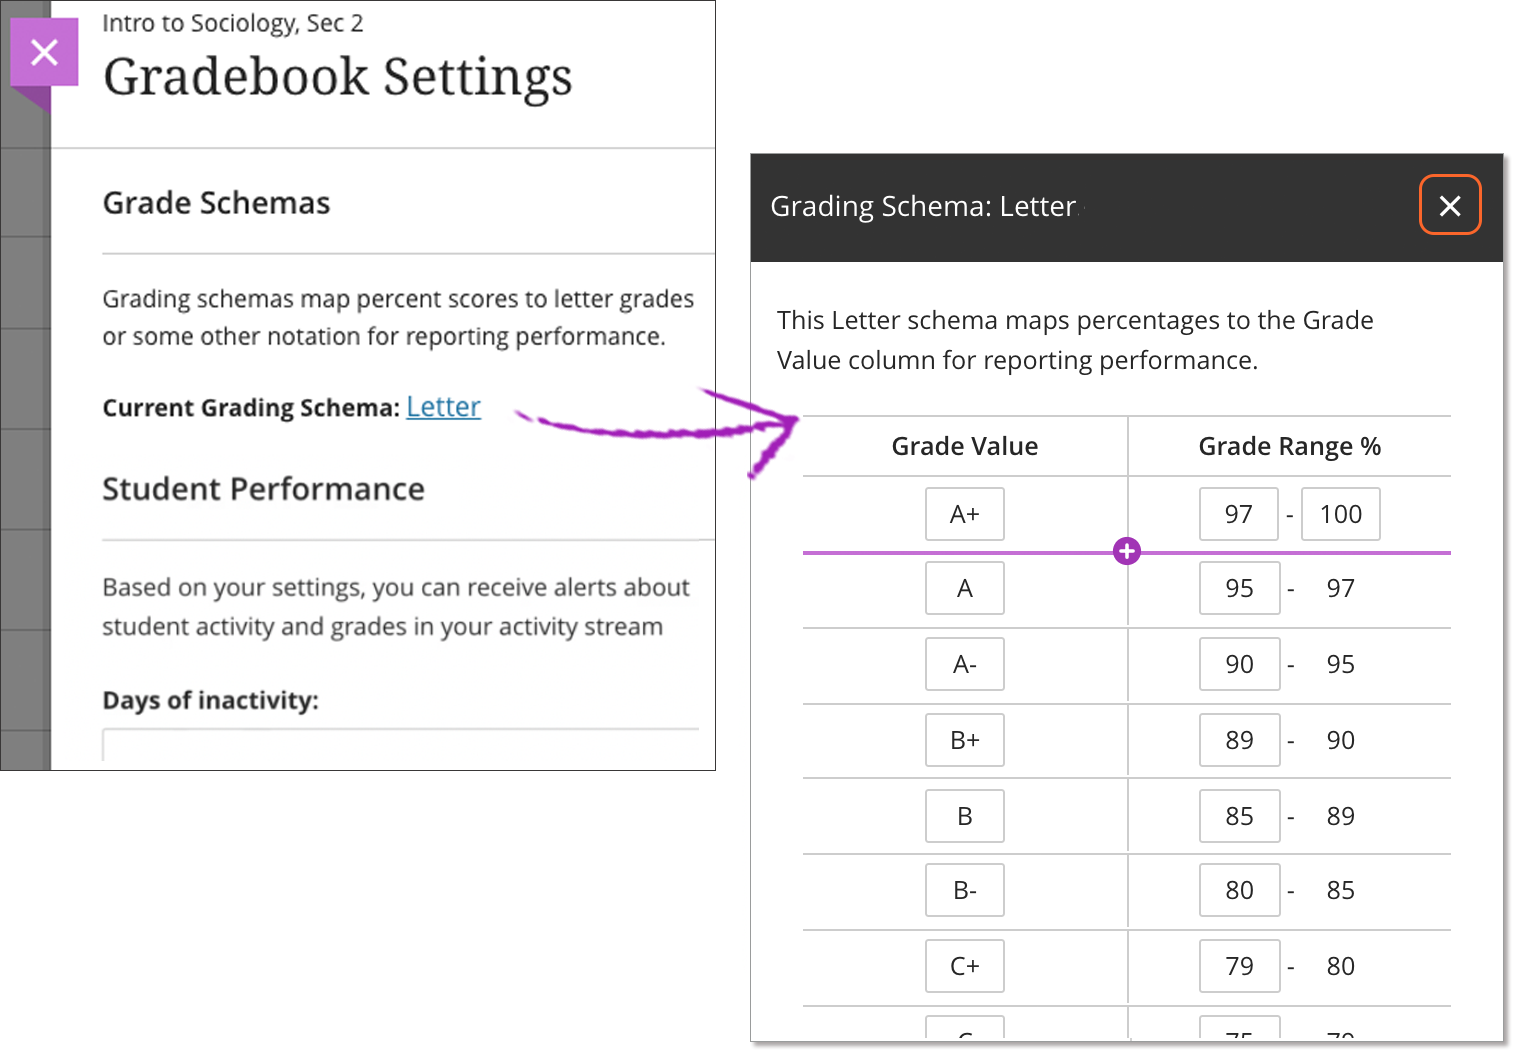
Grade Schemas
You lot can brand changes to the default grading schema. Y'all tin also view the gradebook categories and create and manage rubrics. Last simply not least, you can create and manage form notations to override a educatee's overall grade and assign automatic zeros.
Categories
When y'all create a gradable item, it automatically appears in the gradebook and is associated with the appropriate category. You can utilise categories when you create calculated items, such as an assignments average.
You can create new categories to customize how coursework is grouped in your course. You can use custom categories when you lot set the overall grade.
To create a new gradebook category, select the Settings icon. In the Gradebook Settings panel, select Add New Category and blazon a name.
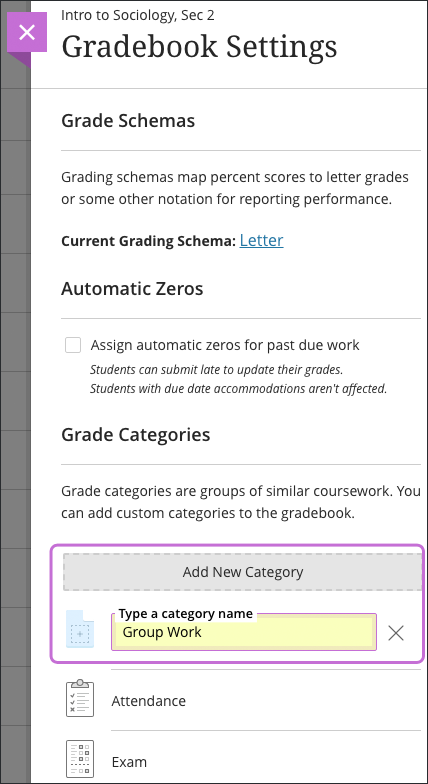
Each time you lot create a graded item in your course, you have the option to change the course category then the detail is grouped into one of the custom gradebook categories. On the Gradebook Settings panel, select the custom category in the Class Categories menu.
More on how to create a test
More on how to create an assignment
Overall grade notations
You can create and manage grade notations to override a student'southward overall grade if their performance falls outside the defined schema. For example, if a pupil has to withdraw from your course in the center of a semester, you lot can use a grade annotation to indicate the pupil's circumstance or situation without assigning an actual grade.
Create a grade notation in the Gradebook Settings console. To utilise a grade notation, go back to the gradebook in grid view and select inside a student'southward overall grade cell. In the menu, cull the notation. The prison cell will plough gray to indicate that you overrode the overall grade.
To remove the override, select the educatee'south overall grade jail cell and select Undo Override. The overall grade reverts back to the overall grade adding yous defined for the course.
Download and upload grades
You tin download the full gradebook or select columns from your Ultra courses. You can export the file in a comma-delimited (CSV) or tab-delimited (XLS) format. Yous cull whether to salve the file to your device or the Content Collection.
You tin can import your downloaded file into an awarding such as Microsoft ®Excel® to exercise statistical assay or other advert hoc computational work.
You lot can as well upload a grade file you worked on offline and update your gradebook.
More than about working offline with grades
Assign automated zeros
You can choose to automatically assign zeros to missing work by the due date. Students and groups tin still submit work after an automated zero is assigned. Then, you can grade every bit normal.
After y'all enable this setting, you don't have to go through your gradebook to manually assign zeros. The automatic zeros setting applies to these graded items:
- Assignments and group assignments
- Tests and group tests
- Graded private and group discussions
The automated zeros setting doesn't apply when you collect submissions offline. You manually create the student attempts and submission dates and times.
More on collecting submissions offline
In the Gradebook, select the Settings icon to access the Gradebook Settings panel. Select the Assign automated zeros for by due work bank check box. This setting is enabled by default in new courses.
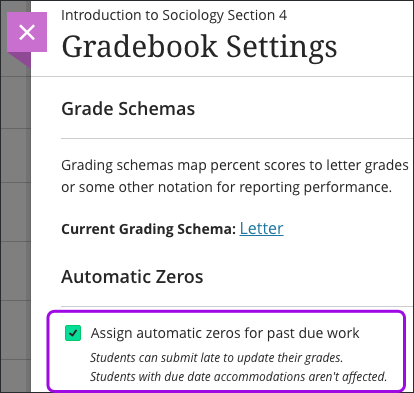
Next, select Assign Zeros. All past due work will receive automatic zeros. Affected students' point totals volition update.
Automated zeros on the Gradebook page
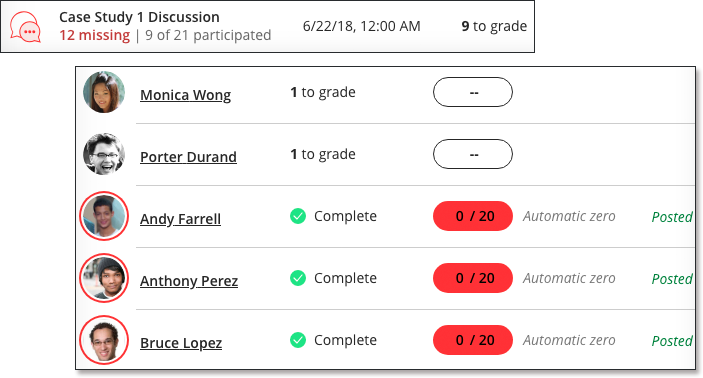
In list view, students' grade pills brandish "0" when no submissions exist and the due date has passed. The label Automated zilch appears next to the grade pills. The label Complete also appears as you accept zero to grade. Automatic zeros mail service automatically.
On the Gradebook page in grid view, the cavalcade titles are in red when the due date has passed. In student cells, "0" and Automatic nix appear.
Students tin submit belatedly to update their grades. You may want to include how belatedly work is graded in detail instructions or your syllabus. When a pupil submits after the due date, the automatic zero is removed. A late label appears with the submission date and fourth dimension.

Students with due engagement accommodations aren't affected past this setting. You tin can add a due date accommodation to revoke an automated zero. Automatic zeros are assigned to work that's past due when y'all add a new student or group to your course.
If a fellow member of a grouping has a due date accommodation, the grouping inherits that adaptation. No one in the group receives an automatic nix after the due date passes.
More on due appointment accommodations
Disable automated zeros
You can disable the automatic zeros setting at any time. In the Gradebook Settings panel, clear the automatic zeros check box. Adjacent, make a selection:
- Continue existing automatic zeros
- Clear existing automated zeros
Automatic zeros volition no longer be assigned. If you cleared the automated zeros, affected students' point totals are updated.
![]()
Change the due engagement
You lot can alter the due date of an detail that already has automatic zeros assigned in the gradebook. You receive a confirmation nigh the consequences:
- Change due engagement to a appointment in the future: Existing automated zeros for past due work will exist cleared.
- Modify due appointment to a date in the past: The particular is now past due and zeros will be assigned.
If yous select Cancel, the due date reverts to the original due date.
Source: https://help.blackboard.com/Learn/Instructor/Ultra/Grade/Navigate_Grading
0 Response to "Blackboard 9 How to Show Column Again"
Post a Comment